Pages

Thursday, 13 December 2012

Marlborough LC - A Celebration!

Last week we were asked to share our journey with other schools within our system (Calgary Board of Education) that have headed down a similar pathway or are in the process of transforming their school library. Here is our story!


Please share and comment. We love to hear feedback!

Building Numbers Online

One of the things we like to try and do nowadays is to have our students represent their understanding in a variety of ways. This is especially the case in math.

When I first started teaching (about 10 years ago) I really only had a few different concrete manipulatives available to me to teach number sense. The one trustee resource I always turned to was the base ten blocks ~ Wow, how times of changed!

This past week I have been working with some grade 1-2s to build and represent numbers using an online manipulative website provide by Glencoe - McGraw Hill Education.


The students were able to build numbers at their own level by choosing an appropriate manipulative to suit them. Here are some examples in more details:
Bears in a Boat reinforces building tens with 10s frames

Students used the bears if they were working with numbers to 20

The virtual Base Ten Blocks allowed students to build bigger numbers.

Students were also able to design their own base ten counting manipulatives - This student used counters


We were able to 'keep' or save each representation by taking screen shots (Command⌘ +Shift+4) of the numbers we built. We then added them a Comic Life document to show a variety of numbers.


Wednesday, 12 December 2012

Keeler School Virtual Space

Our Virtual Learning Space
Keelercommons.weebly.com 

"The minute I dropped out I could stop taking the required classes that didn't interest me, and begin dropping in on the ones that looked interesting." - Steve Jobs

I believe that the statement above is in support of the Learning Commons Virtual Space we are aiming for at Keeler School: A site that students contribute to and choose to use from any device, at any time, simply because they can't stop thinking about their schoolwork!

We've been working extremely hard on the philosophy in the school and on the physical space in the Learning Commons itself. Now, though, the focus has shifted to anywhere, anytime learning.
We chose Weebly as a site-creation tool because it looks great on all devices. It is also extremely easy to embed collaborative documents, forms, spreadsheets (from Google Docs), and PDFs (scribd.com). It is important that google forms can be embedded in there, as we are a google trial school and we're finding the feedback to be invaluable. Here is what we have included so far.

Tutorials.
I've found that I'm teaching the same "click here, now here, now here" to help students with simple or complex tasks on their computer... So the next logical step was to create short, snappy tutorials to help students out!The newest section on our virtual space is tutorials.

Students and teachers can hover their mouse over Tutorials and select the program they are using. By clicking the video that is connected to what they need they are stepped through whatever they are struggling with. I'm trying to keep the clips under 2:30, so they can be watched and absorbed quickly. I've found this to be helpful as students can watch a tutorial as frequently or infrequently as they need - meaning that it levels the playing field a bit. And if students are working at home, they can see them there as well, 24-7.

I've tested this out during a few classes at this point, and found it hugely successful - despite how strange it was to hear my voice coming from different corners in the Learning Commons!

Projects.
This section is dedicated to projects that are taking place in the LC. Students are able to click on their current unit of study to find links to resources or online work they are doing (for example, the grade 4s are working on their first Wiki). This section will hopefully grow to include teacher write-ups about the projects, student samples, rubrics and links. We'll see... It's still young!


Forms.
By embedding google forms, all students can feel like they have a say about what is not only on the site (as in links, pictures, etc.), but they will also feel that they have a say about what books are in the Learning Commons. I'm just getting this going, so I'm offering a prize to students who provide the best resources in the 4th and 5th grades... Hopefully in the future I won't need to do this...

Teachers have also been using embedded google forms. And it has been an astounding way to communicate with our technician who we only host for 3 hours a week. In this section, teachers are able to report any technical problems with their SMART Boards, student computers, teacher computers, or printers. So far, it seems like a promising way to remove the middle man (me) from wasting time attempting to solve problems that are time consuming and complex!

Class Web Pages. We signed up to use the project server from the Calgary Board of Education and made it available for teachers to create class web pages on iWeb. Student work is being posted up in a variety of ways - sometimes it is pictures of students working in the classroom, problem solving a task. Other times, teachers are using the blog feature to showcase student writing. This has created a sense of pride in the students, and we have found the visits to our sites steadily increasing.


Links.
We've included links to everything from the Khan Academy to Glogster. We're looking for students to take initiative and either check up on concepts they don't fully understand, or to try a new web 2.0 tool. It's my belief that we should not shelter students from these tools, but instead teach them how to use them in a responsible way. When we asked our students in grade 6 last year who was on Twitter about half of them raised their hands. When asked if they upload to Youtube, about a third of them admitted to having a channel. They are going to do it anyway, we need to teach them how to be smart, not turn a blind eye!

We have links as well to the e-library (CBE's online catalogue). In the future, I'd like to post tutorials on how to use a catalogue and how to find books through the Dewey Decimal Stystem. 


Admiral Use Policy. 
We have also included a page dedicated to our Admirable Use Policy at Keeler School. This was developed at the start of the year, and we're hoping to get students using it and thinking about how to properly behave online. Again, I was thinking about having students create videos describing digital citizenship... I just need to overcome the paperwork and see if we can put them online!

Feedback.
I'd love feedback... If you're reading this you are most likely connected to education in some way or other. What would you add? What should be taken out/simplified? Do you have any suggestions for other great Web 2.0 tools to help students to represent their learning?

Thanks,
Mike MacKenzie

Wednesday, 21 November 2012

Got iPad?

Our school bought iPads in the Spring of 2012. After a trial period to explore their value we soon came to realize that they would be one of the most powerful and exciting learning tools we have would have as part of our learning commons.

This post is dedicated to the work that we do on our iPads. I made the following blog/website to share  some of the amazing work that our students do on our iPads.


We love to share the work our students do and we also love to have feedback on the projects. Please visit and share your thoughts and ideas.

Cheers!

Steve Clark
Marlborough Learning Commons.

Wednesday, 7 November 2012

The Virtual Learning Commons

One of the latest developments in The Marlborough Learning Commons is the introduction of the Virtual Learning Commons, or as we are calling it, 'Marlborough 5th Corner' - https://sites.google.com/site/marlboroughvlc/.

Marlborough 5th Corner - Screen shot
Screenshot of the "Marlborough 5th Corner" Virtual Learning Commons Homepage

The name fifth corner was 'borrowed' from another learning commons that inspired us to begin the journey, the Monterey Park Learning Commons. It refers to the Learning Commons being an extension of the classroom, or another part of the classroom. This also applies to the Virtual Learning Commons. This online space is simply the online hub of our learning commons space. It will be a place that students go to when they begin a journey of learning in the online environment.

Our hope, in launching our VLC is that we will make our Learning Commons come alive at all times of the day, whether it be during school hours or after school. When students want to access certain documents, information, or work on collaborative projects, they will come to the VLC and then be spring-boarded in a certain direction depending on where they need to go. Throughout this year we hope to launch new areas of the VLC to make a truly collaborative work space.

Our Virtual Learning commons design is modelled off a template that was offered to CBE school by the 'gods' of the Learning Commons concept, David Loertscher and Carol Koechlin. The template they offered can be found here. More information about the Virtual Learning Commons can be also be found on the Library to Learning Commons Page they created for the Calgary Board of Education.

At this point, we have five pages within our VLC. They are as follows:

Home Page - Welcome and News

This is where we will upload the news of the learning commons. Anything new that we want students to see as soon as they open their web browser.

Love of Reading - Literacy Centre

As a part of our school development plan we are focusing in on improving reading skills. We also hope to encourage our students to love reading. One way we hope to do this is through promoting books and web sites that we (and others) think are worthy of reading and. We also will ask our students to add their favourite books.


We are planning to start a blog (using www.kidblog.com) for students to respond to books they read and then share their thoughts with their peers. Through the use of QR codes and possibly Aurasma (Augmented reality) we will share blogs posts that students write.

We have also started a book of the week which could be chosen by teachers, or by students, and then promoted online and in the library.

Book of the Week/Month for November - In true Remembrance Day spirit.
Our First 'Book of the Week' QR code

LC Links - Links to Internet Resources

The links page is a collection of tools and reference tools that can found from a variety of places. We have collected these over time and are continually weeding and reevaluating them. 

How We learn - Ideas for Learning

This is a page that I, as the learning commons teacher want to begin developing. Here will will have different ideas of showing what we know. It is a place to get ideas for projects, share ideas for projects and showcase and celebrate the diverse ways we learn in our school.

Marlborough Life - Culture Page

We place a fair bit of energy in our school to help develop the culture and community of the school This page will share some of the activities that are going on throughout the year. We will begin adding to this page very soon.

LAST OF ALL...

We welcome comments and questions about our virtual learning commons. We want to make this website a live and would love all the feedback we can.

Monday, 5 November 2012

An Intro to the hub of our school

Welcome to Falconridge Learning Commons!

My name is Ms. A and I work in this wonderful space with all of our students and teachers at our school. This place can get pretty busy. Here are some of the things that this space has allowed us to do in the last few months.

Grade 6 Social Studies (Social Action)

The grade 6s celebrating WE day and watching the live video in Calgary.


Grade 2 Insects and their Habitats

Grade 2s busy creating their insects and insect habitats to share with their teachers.


Grade 1 Senses Centres

Recording observations from a microscope

Tasting and Describing Samples - then recording data
                      

Touching and Predicting what is in the box


Grade 2 Teachers Interviewing students while they work


Grade 1 Teachers observing and having conversations with their students about senses being used and their importance
    

Wednesday, 10 October 2012

Building and Tinkering

To follow along with Keeler school, we started utilising some Lego that we found in our building.

Rejuvenating the Lego 

When we found the Lego it was pretty disgusting. Years of sitting in a classroom gathering dust. So after a thorough washing at home and a long time to air dry, the Lego came back to school and put into some great use!

I had a great helper throughout the cleaning process

The Project

Two of our grade 1 and 2 teachers wanted to use our learning commons to divide their classes into smaller groups to do some building centres for the grade 2 science unit, Building Things. The learning commons hosted the Lego building and iPad Lego building centres and the other two groups were back in their classrooms. We gave the students some free building time so they could play and tinker with each of the materials (Lego, iPad, Straws & pipe cleaners, popsicle sticks & modelling clay, foam building blocks, and smaller wooden blocks)


After every student had a time to play with each of the material and build something of their choice, the task was to build something specific with each of the different materials. This what they were asked to build:

  • Lego - something that moves
  • Lego App - some kind of box or container
  • Straws & pipe cleaners - a creature
  • Popsicle sticks and modelling clay - a shelter
  • Foam Building Blocks - a piece of playground equipment
  • Small Wooden Blocks - a tall tower
What we found out was that the kids (in general) were way more creative in the free building sessions. When we put certain parameters on the building tasks, their creations seemed dulled down and lacking creativity.

So We CHANGED It Up!

As I began working with these two classes, I was also beginning a similar project with another grade 1-2 class. This time we changed the project around to see if it would make a difference with the quality of learning. Here's what we did (and are still working on as it's continues to progress):
  1. Each student had a chance to play and free build with each of the materials.
  2. We will then have a class discussion about what we all made (using the photos they took with the iPads) and why they made it - This will help develop the assessment criteria for the next part of the project.
  3. Students will co-create a target rubric of the assessment criteria.
  4. We will watch some video and multimedia of what other people have built with some of the materials (this is the expert portion).
  5. The final task will be to build 3 different models. Students will choose their materials and also the structure, or 'thing', they want to build. We will also generate a list of possible 'things' they might want to build, but not limit them to this list.
  6. Students will be assessed according to the student generated criteria. This could be done as a self assessment, by their peers, and/or the teachers.
Here are some more pictures and videos of what they created during free building:


Sunday, 30 September 2012

Diagnostic Assessment & Space Exploration

Accessing Prior Knowledge & Starting on the Right Foot

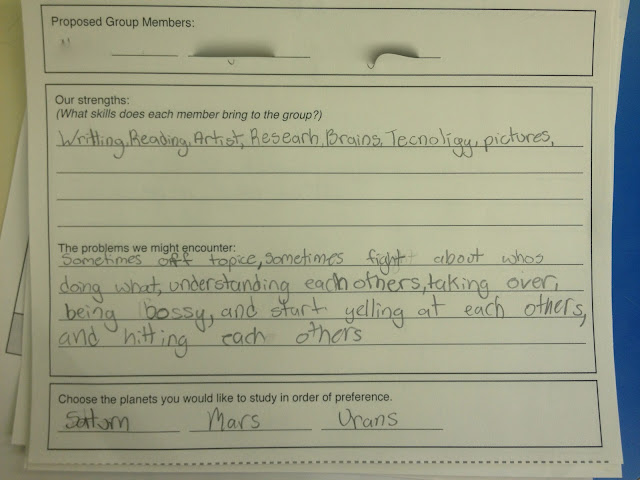
We began an exciting group project the other day and thought it was important to start with self-reflection and diagnostic assessment through informal and formal conversations. Students filled out group proposals (below) where they had to consider their strengths within a group. We also challenged them to think about their group members and how they've worked together in the past...


Project:  You have been recruited by CETSA (The Canadian Extra Terrestrial Space Agency) to create a community proposal and a recruitment video to lure earth-dwellers to colonize your planet. 


** Students will hold a "recruitment fair" in the Learning Commons for all grades of the school (and perhaps other schools through online video/voting). Students will vote on which planet they would like to colonize based on given criteria. 

Day 1: The Hook
Each student received a letter in the mail from CETSA directing them to save humanity.They showed up to school with their letters clutched in their hands or crinkled in their pockets, ready to accept their mission! They were then tasked with identifying and resolving hazards in a colonization report to permanently settle a planet in our solar system. They will soon create a recruitment video/presentation to lure settlers to their planet - which they will later create a government for.

We gave students the sheet below, allowing them to choose their own partners. Using a sheet like this had a number of predicted and surprising benefits, here are the big three:

Self Reflection - Students were able to discuss their strengths and shortcomings in a safe environment, among chosen friends.

Group Reflection - Students analyzed the relationships within their team and identified possible issues, as well as where they may soar. It was interesting to see how students grouped themselves - some students purposefully avoided their friends!

Access Prior Knowledge -  Students were forced to access prior knowledge and to discuss what they already knew about the planets and what they wanted to learn. This discussion was further enhanced by the pesky, roaming teachers asking clarifying questions and taking notes.

The sheet we used is below, as are some samples taken from students on Friday!

Group Work and Getting Started

Some of the responses...
Some of these are hilarious, others are insightful... I think the process and the discussions we video-taped were the true gold in this. 


Problems with "big giant words such as the Encyclopedia" 
The "Who does more work" comment showed up on lots of these. 
Human Typewriter and has great potential in research and studies...

This group really hit the nail on the head! This was exactly the same problem they had in our last project... Although I didn't know about the hitting!
It's okay to laugh a lot! 

Wednesday, 26 September 2012

So I built a Lego Wall...


Lego and Math

So I built a Lego wall to teach math today! Initially I was going to glue the lego base-plates to a wall and wallpaper it from top to bottom - but I realized that the true learning potential came from being able to work on the base plates, and then to post them to share progress. 

Lego Baseplate with velcro on the
back to mount to the shelf.
After discussing a few options, we settled on velcro tape. We fastened it to the back and mounted the other side on the edge of a bookshelf. This way it could get that “wallpaper” effect that I wanted, while at the same time have the portability and individual work space of a single plate. Although I’ve just done the first “wall” I’m going to go in early tomorrow to make the other 3 (on the ends of the book shelves sticking out of our walls). 
Part of our work this year is going to be around experimenting and finding ways to use lego for math. Considering that it is a grid, we’ll be able to work on having students model patterning, multiplication (through arrays and groups), addition, subtraction, area, perimeter, rotations and an endless number of other tasks. Actually, it could be fun to set it up as a cartesian plane and play some battleship... Or to create different graphs to show collected data. 

I’m excited to move on this... Luckily we have an amazing teacher who wants to spear-head this with me, so we’ll be throwing some stuff up on this blog in no time, I’m sure!  

Some days I just love my job. 

Mike MacKenzie


Lego Wall:

Friday, 21 September 2012

5 QR Code Uses


Our 5 favourite ways to use QR Codes -

Debit Cards - We've created "Library Licences" for students to come to the commons and take out books. The idea behind the licences is simple: With student photos, barcodes, and a signature, they'd take seriously the books they borrow and the standard they return them in. Plus, they all laugh when we tell them in serious voices, that no matter what their parents say, they are not allowed to drive the car!

Anyway, the grade 6 teachers wanted to teach the students about debits, credits, and managing a bank account, so they created the ultimate money-management system: a Google spreadsheet for each student linked to their own personal QR Code. This is fairly forward sighted as we only have ipads and iPods borrowed from the ILC downtown... But we have big plans if a grant comes through...

These are our Library Licenses... I've had to cover up all of the student info-
 the other one just shows what goes where.
Learning Commons Commercials/Area Descriptions -As we're converting our library into a Learning Commons, the students are just now starting to understand the possible uses of the spaces. As such, the fifth graders are working on creating video advertisements for each section and posters to house QR codes that link to the commercials. Both will inform guests and students about ways to use the space and will make the areas more appealing.

Book Responses - Students are working on a number of reading responses including movie previews and reviews and dramatic reenactments, among others. We're connecting the QR codes to the inside/outside covers of books to help future generations of students determine interest in the books and to see the legacy of students past.

Past Events - Having student work on the walls is important in building the atmosphere and philosophy behind the Learning Commons. It has a growing history that needs to be recorded and displayed, even if it is video! QR Codes connect our Learning Commons to past events and memories. This is especially important for those kids who rarely experience success in school - the posters on these walls with the videos linked to the QR Codes remind students of the success they've achieved. It also shows others in the school what can be accomplished through hard work and determination.

Classroom Newsletters - Our teachers are working on classroom web pages that contain everything from student work and rubrics to newsletters and year plans. Teachers have been throwing QR Codes in students' agendas and on newsletters. The result? Increased traffic from both parents and students from home and at school... Edging us ever closer to that 24-7 learning!

This isn't part of the newsletter - but if you have a second,
I'd browse the awesome work our grade 6 teachers are doing!


Social Media Forever!

The things we don't think about, or realize, about social media - One of our grade 5/6 classes were discussing Terry Fox and a way to find out more about him. One of the students thought they could look up his Facebook page - "because it might be still around from when he was alive". The class agreed that would be a great idea! Of course, Terry would've had a Facebook page - everyone has Facebook.

Little did they know,  Facebook wasn't around, or even close to being around, in 1981. These grade 5/6 students just assumed that Facebook has been around forever. Social media is such a normal part of their young lives that it must have been their for everyone.

Another class that I was working this week (a grade 4/5 group) was discussing Terry Fox as well. I thought we could tie in what the other class had come up. So we decided to make a Terry Fox bulletin board (Faceboard) and imagine what his Facebook page might have looked like when he was alive. Our question was "How might Terry Fox go about promoting the Marathon of Hope if he was still alive now?".

Some of the students had a hard time thinking about this and implementing. Some thought that they couldn't do it as they weren't allowed a Facebook account. Others were fine with the idea and fully understood the concept.

Students were to post messages to Terry Fox to thank him, ask questions, write them from his perspective.

This is what they came up with.


The first posts were exactly what I imagined they might look like. Relatively weak and lacking any kind of substance. After some feedback students were able edit their thoughts and give their post some more oomph. This is something we will definitely work on and develop in the future.

What a great discussion about the positive power of social media and the reason why some people use it. It also showed students that us old teachers even value Facebook and that its OK to talk about it and include it in our learning experiences.

What next? 

We thought we could leave the main part of this bulletin board up and change the contents. It would be a great way to promote Social Media for a good cause. We thought we could even try real time posting, where students could post notes using post-it notes or something else similar.

I wonder what else we could do? How else could we promote the use of Social Media as a learning tool to elementary students?

Pleas feel free to comment. We would love feedback.

Measurement & Mapping


Our PhotoPeach Slideshow: (Beware - some students are faceless/headless to protect their identities!)


We (the grade 6 teachers and I) have just finished our first, ubre-successful class showcase in the Learning Commons! The grade 6 students masterfully measured, mapped, modeled, displayed, and shared for the Learning Commons.

Phase 1: Hook

Our Learning Commons is a new and challenging concept for teachers and students in our school.  For each grade's beginning project students are working on lessons around belonging and ownership of the space. Each grade has created something that will stay in the space or that will enhance the space in some way.

After completing an iPad photo scavenger hunt of the space, the Grade 6 students discussed what was missing and what would make it better. Eventually they decided (with some guidance) that the learning commons needed a map - I was more than happy to work with them on that. ;)

Phase 2: Measuring and 2D Map

After printing out some architectural paper, students were introduced to the challenge criteria and set off to measure the space any way they wanted. We suggested 3 ways:
  1. Snap Cubes: Students put 1 snap cube on each tile, collected the snap cubes in sticks of 10 (or 5), and added up the sticks. 
  2. Post-it Notes: Students put post-it notes on every 5th square (or whatever multiple they felt comfortable with) and collected them while skip counting or multiplication. 
  3. Counting: Some just counted each tile as they walked from one side of the commons to the other.

Students counted the tiles and completed a map where 1 tile was 1 square on their paper.  Because we teach students with a range of skills, we wanted to make multiple entrance points and lots of extra challenges to keep them engaged. We organized the challenge criteria into 3 columns (below) to meet individual need. All students were expected to complete a Level 3, but should aim as high as possible. 

This was displayed at all times during the independent work times.
If students finished level 3, they knew to move to level 4, and then 5.

Phase 3: Mapping in 3D for future displays and proposals. 

Now came the fun part!  Students could take their 2D maps and transform them into 3D masterpieces using a computer program or a hands-on-material of their choice. We gave options to use Google Sketch-up, Plasticine, Minecraft, Lego Digital Designer, or whatever other way students wanted (as long as teachers approved it). 

We were shocked when a student discovered Floorplanner.com - and the enthusiasm for this program quickly took over the group.  We were also pleasantly surprised by the students using Minecraft and Sketch-up. And one group took on this project by re-creating the entire Learning Commons using paper! Actually, it was 2 groups that both realized they bit off more than they could chew and asked if they could team-up and work together to get the project done in time... We obliged.  Check out their amazing work below!

Phase 4: Show and Tell
It's hard to believe that we're 3 weeks into the school year with a 3-week-old learning commons. Our entire school community came during our showcase and were all blown away. We worked with the students and practiced talking about: 
  • Why we completed this project
  • How we mapped in 2D/3D
  • Who the maps are for (everyone in the school!)
  • Ideas they had to improve the space
The showcase was important for a number of reasons. The other teachers in the school were able to see what type of work can take place in the Learning Commons. It gave them a chance to talk to me directly and to ask questions. More than a few times I was asked about what the planning and teaching looked like, and how we made it work. 

Students were able to look up to the grade 6s, as each student completed an enormous amount of work and was a role model for the younger students. The younger children were also able to inquire about the process and to ask questions about the math (area, perimeter, ratios, etc.). Students wanted to experiment with the programs they saw the grade 6s use, most notably Keynote and Floorplanner.com.

Phase 5: Where to now? 

We're going to have students take their current 3D representations of the Learning Commons and make proposals about how the space could be used. They'll also create proposals, sharing what they think would make the space better...I'm already running with the idea of building a lego wall - but more on that later!